S

Funwithnancy

Follow Me on Pinterest

Tuesday, June 2, 2015

That's Entertainment!

Hi All, I bet you thought I was a blog deserter! Well, I'm not! I'm just a bad blogger! I have been busy with tons of projects and I'm the worst at taking pictures and downloading them. I am, however, very excited to show off this project. I finally finished my entertainment unit! This post has a ton of pics so I'm going to keep the narration down to a minimum. Please feel free to leave comments any questions. Enjoy!


To the far left you will see my TV against a plain wall. I wanted a custom built entertainment center, but not the custom built expense!
At work a really nice bookshelf wall unit was for sale, but it was way too tall for this basement space. The price was $300.00, so tempting! I called my brother Sam, asked if we could cut it down, and as always he jumps in, and helps (OK! as always I drag him kicking and screaming!!!)

Work dropped the price to $150.00 and I had to have it! This is my amazing brother Sam! Love you Bubba! He is so patient with me. We removed the center dividers, and built a shelf to support the TV.
We staggered the top heights, pushed the two side shelves to the walls, removed the backs, added beadboard, built headers, and footers.

The TV fits perfectly, and so far, I am loving the unit. Sam's job is all done now, and the rest is all on me!


If you have ever read my blog, then you know how much I love adding trim and crap to my projects! I love rope trim and lions!
Matching up holes for the shelves was NOT fun! I made myself a template, but I'm not sure it really saved me any time.
Primed and ready for paint

adding trim, shells, and scrolls.  I make my own design using smaller pieces and combining them because buying these in the lengths that I need (want) is very expensive.


I used two different paints, a creamy white for the beadboard and shelves, and a dark gray by Martha Stewart. I think its called slate or steal (I know I suck! but I can always look on the can if someone really wants to know). The next few frames show some detail.


I used my all time favorite black walnut stain for depth. I love this stuff!
Always looks amazing!


And then the part that really is a time suck! Plastic, tape, plastic, tape, plastic tape! Spray on poly-acrylic top coat.

TaDa!!!!! The finished unit!
I think it's awesome! I spent less than $1000.00 on materials and paint for the entire unit, not counting the endless hours of work and the fact that my Brother worked for free!
We found strip lighting at IKEA for about $25.00 and anytime we feel "Disco-ish" we can turn up the funk!
Not bad!
I love all of the detail this piece has.


So, I promise not to let another year go by. I have a few more projects to load up. Let me know what you think!

Sunday, March 2, 2014

Baby Shower cake pops

It's been a little too long since my last post. I am a slacker to say the least! I am snowed in today and had a revelation that I would blog. I can not believe how long it has been since my last entry. So, If anyone is still following me, Hi......Here is a cute little tutorial on sprucing up some cupcakes for a baby shower.
 
Make cake balls (the right way, see my tutorial here, If your a comedian and want to see how NOT to make them then read this)
I like to dip my stick in melted chocolate to act as "glue"
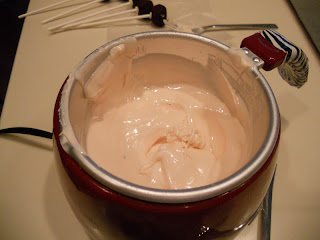
If you don't have a candy melter, use a double boiler (I usually put a glass bowl over a saucepan with enough water to boil, but doesn't touch the glass bowl bottom). This is my niece's candy melter, I didn't think it was any easier to use than a double boiler.
get some miniature cupcake liners and cut a slit down one side
Dip all of the cake pops in melted chocolate. I tinted these with a very small dot of orange to make a flesh color. Place in refrigerator for about 15-30 minutes to harden
After the chocolate has hardened, place each one into the liner and tape the bottom around the stick. This makes the top flare out like a little bonnet.
Hot glue a bow, and with brown colored chocolate, or melted chocolate chips, pipe a face onto each one. I put them back into the refrigerator for 15-30 min and your done!
I carried them in Tupperware with wax paper between each layer and placed them in the cupcakes at the event. I also make some chocolate letters of the babies name and used them as cupcake toppers.
I need one of those great cameras so my pics actually look as cute as the finished product!
Here is Diana, the Mommy. She had a boy by the way.......
 

Monday, July 9, 2012

Beach Inspired Table

I saw this table in an art flyer a few years ago and I fell madly in love with it. I have searched high and low for a similar table but just couldn't find it. Of course it had to be super cheep because I really had no idea how I was going to execute the process.

When I purchased the coffee and end tables (see that tutorial here) it came with this little sofa table. I decided to go for it! I only paid $100.00 for all 4 pieces so $25 bucks + materials felt like a good price for the experiment.
Mr. belt sander did the hard work on the top. I lightly hand sanded the legs.
2 coats of primer
I purchased all of the shells for around $12 bucks
Next step glue on the shells. Big snafu! None of these worked, except the super glue. It nicely glued my forefinger to my thumb (yes, I had on gloves! Darn small hole somewhere....)
I had a brilliant brain moment and came up with this idea! Tile mastic stuff. You know the stuff you lay down before you stick the tile to the floor.
It spread beautifully! Like frosting. Very easy to clean up with a damp rag.
I arranged the shells, and this stuff stays wet for a few hours so it's easy to rearrange shells. I let them dry for about 3 days.
I painted the bottom part blue (I mixed two sample jars I  had to get this shade). When dry, I glazed it with 3:1 ratio of faux glaze and water soluble Black Walnut.
I painted the top with 2 coats of primer, 2 coats of white, and strategically painted on some accent color. This is a sample color called wicker from Lowe's.
After it dried, I used a sample color called Dove from Lowe's and a wood graining tool.
After it all dried, steal wool, then 3 coats of polyurethane. Don't use polyurethane if you want it crystal clear. Use polyacrylic. I didn't want to spend the money to buy polyacrylic and I really regret it! I had 2 cans of the polyurethane and used that to save $. It turned yellowish. I knew it would.....
Now comes the messy part. Mix up sanded grout with water to make a semi-runny paste
Put it into a plastic baggie, snipped off one corner (once a cake decorator, always a cake decorator)
squeeze it into all the nooks and crannies between the shells and fill in all the holes. I used a combination of my fingers, and this small cheep art brush.
Why did I do this? Because the mastic looks like dried glue and that's not the look I was inspired by. I wanted a washed up, beachy, look. Here is what the shells look like on dried mastic.
And this is what they look like once the grout is shoved into all the groves and wiped clean with a wet cloth. It has a nice cohesive, sandy beach look.
Cover the legs up because the next step was to spray all the dried grouted shells with polyacrylic. Yes. polyacrylic. I actually found one partially used can in the basement and was excited to use it.
This picture was straight when I down loaded it. So bear with me.... I mixed a 4:1 ratio of Faux Glaze and a taupe acrylic paint.
The shells were just too white. I wanted an aged look. See the difference between the left and right sides.
Next, time to dirty up the shells. Straight up water based Black Walnut (my all time favorite color and product). By the way I do not monetize, so no biased information here. Just the stuff I use, and like.
I used a clean lint free cloth and an old art brush to dab it on and then rub it in. If the color was too dark I simply diluted it with water.
Here it is before the stain
And after. Me loves it!!!!
Here it is all done. I love it! I slightly distressed the table before the staining and sealing stages. My hope for the top was to make it looked like drift wood. I'm not sure I accomplished that, but I like it. I don't love the top, but I don't hate it enough to strip it.
My beachy end table. It lives at the lake in one of my bathrooms. I do not believe it will live there forever. I'm thinking maybe my bedroom, or the hallway. So, What do you think (besides I need a good camera).