S

Funwithnancy

Follow Me on Pinterest
Showing posts with label baby. Show all posts

Sunday, March 25, 2012

Zebra Banner

Look who's finally back! Somewhere in the middle of presenting baby shower week I fell and tore my right hip labrum. I had surgery to correct it. I am now able to sit up (for about one hour) and get this blog thing on the road again. Sorry for the interruption.
Today I am going to give you a very remedial tutorial on how to make a banner. It's for people like me who don't own too cheep to purchase a Cricket machine.
Hobby Lobby (remember I don't monetize so no promoting going on here) was having a 50% off sale on crafting paper and cutters. I was smack in the middle of my niece Maria's baby shower, so I was sucked into the whirlwind world of paper punchers. Before this banner I had made Zero banners!
I purchased zebra and pink scrapbook paper because it was on sale (too cheep to buy the already cut stuff)
and cut them to an arbitrary size that looked good to me. I basically cut each sheet into 4 pieces.
Armed with my IPad, a black sharpie, self-adhesive rhinestones, a corner punch, and straight punch I lunged into a paper crafting frenzy!
Corners where the easy part. Just insert paper and press. I googled fonts and just free handed my letters.
added some bling, cause that's how I roll.
Cut my zebra paper about one inch larger than the pink paper, and punched the corners.
the straight punch has line up holes that took some practice figuring out how to actually line it up.  I practiced on a few scraps before starting the project.
Now, if you buy precut paper (it's really expensive compared to 50% off scrap booking paper) these corner punch and straight punch holes line up perfectly. I cut my own paper so I had gaps. My saving grace is that this banner is going up about 6 ft over a kitchen pass through window and the paper is very busy visually.
I used a singe hole punch and just punched a few holes (this is where the real crafters are laughing at me)
I had small areas like this, but I didn't care because I knew no one would be able to see them.
Do you see them? Now imagine this 6 feet up in the air.
On the sides I lined up these gaps where the ribbon would be placed. An easy way to let an error look like it was planned.
At this point I wasn't sure how I was going to hang this banner, so I punched one hole in each gap for ribbon.
Here are my Martha Stewart hole punches. I use them all the time for other projects like doilies, place cards, tags, etc. I would not have purchased them at the regular price of $28.00 so I'm really glad they were on sale.
I used stick glue to attach the top pink portion to the back zebra paper
And that's it! How cute is this?
I wanted the banner to read "Baby Cook" but it needed something between the lettering. I googled "pregnant silhouettes" and free handed this onto the pink paper, used my black sharpie to fill it in, cut it out, and glued it to the pink paper. To finish it, I added some blingage.

Lined up the project on the table and took a good look at it. My letters need a little something more so I added squiggly loops to the font.
You need to know the length of the intended hang area. I added about 10 to 12 inches of additional ribbon to each side so we could extend it, or tie a ribbon if needed once it was hung. I used a rough guesstimate of where each letter should be.
I decided to go with wide ribbon and hot glued it to the back. I also embellished with pink plastic diaper pins.
Not a great picture, but it was really cute at the shower. This entire banner cost me less than $5.00 because all the items were 50% off. I didn't include the cost of the punches. It was a big hit and the Mama-to-be loved it!
What do you think?

Tuesday, May 17, 2011

Amber's Cake

This beautiful lady is one of my dearest friends Amber. Amber is not only beautiful on the outside, but she is beautiful on the inside and has the heart of an angel. When we (Jana another wonderful lady that I am blessed to have in my life) found out Amber was pregnant we immediately started planning her baby shower.


This is the cake I made for her.


It's an animated version of her nursery. The bedding has stripes & circles with this color combination. Except I'm pretty sure I made the green a little too "Kelly green". I was working off a web page, give me a break sista!
Little elephants graced the cake.  Here is a small tutorial on how to make this lil guy. You can see some spare parts in the back ground.


Make a ball (size depends on how big you need your elephant to be), then elongate one end of the ball by rolling your finger over it until your ball now looks like this.

 make some linear creases on this piece. As you can tell this is now the elephants head and trunk.
turn the head on its end and poke 2 holes in the end of the trunk. Now this lil guy can breath!

Make another ball slightly larger than the one you made for the head and poke a broken tooth pick into it. This is now his body, and the tooth pick will support his head. Make sure your tooth pick is not long enough to poke all the way through the head.

Place the head on top of the tooth pick. I like to brush every body part that is being attached with a little water. It helps glue the pieces together.
Now roll out 4 pieces of fondant for arms and legs. Make the legs just a tad bit longer. Using a butter knife crimp the ends to make feet and hands then use the back of a tooth pick and indent little toes & fingers.
I like to make a hole where each arm and leg will attach to the body. Slightly roll the appendage end so that it fits into the hole. Brush the inside of the hole with a little water, and attach the appendage.

Now poke a hole on each side of his head in preparation for his ears
I use the end of a decorating tube but any small circle will do. If you want the inside of the ears to have a different color, repeat this step with the desired color and place it on top of the grey part. Just off set it slightly. Pinch the end of the circle to make an ear.
Attach to the hole in the head with a small amount of water. Attach his tail, cut 2 very small white dots for his eyes. Using a tooth pick dip it into black food coloring (I use Wilton paste found easily at Hobby Lobby or Micheal's) and dot him some eyes.
He's done!
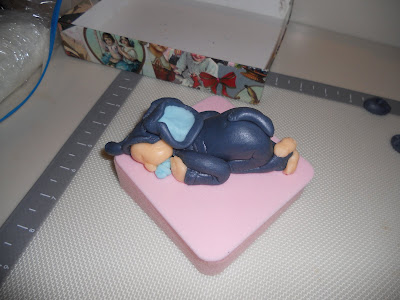
Next I made a little baby boy who feel asleep in his elephant PJ's
 (that I am sure someone like his Aunt Nancy bought for him!)

I love his butt! So cute!

This was the first time I made one of these babies and I didn't take pictures of the whole process because I really expected it would take me several tries, but It came out my first time! So I didn't tempt fate by trying to remake him.
If enough people twist my arms, I will make a tutorial on it.

Here he is sleeping with his pacifier in his mouth on his blanket with toy elephant and his slippers on the side.
Don't you just want to eat him up? Literally !
The cake was white but I tinted it blue with chocolate chips so it looked like brown polka dots.
I didn't get a picture of that! Sorry :(